BAJA MINIBIKE CLUTCH TO TORQUE CONVERSION
Thanks to Paul Dickenson, below is his procedure on what he did with pictures.
TIP #19
How to Switch from clutch to torque converter on the Baja Minibike
Torque Converter/Mini Bike Mini Baja mini-bike model MB165 , made by Baja Motorsports
For a Mini Baja minibike, and I put a Comet Torque converter on it. I am very pleased with how it came out. It made it much faster too. Here's what you have to do (or what I did):
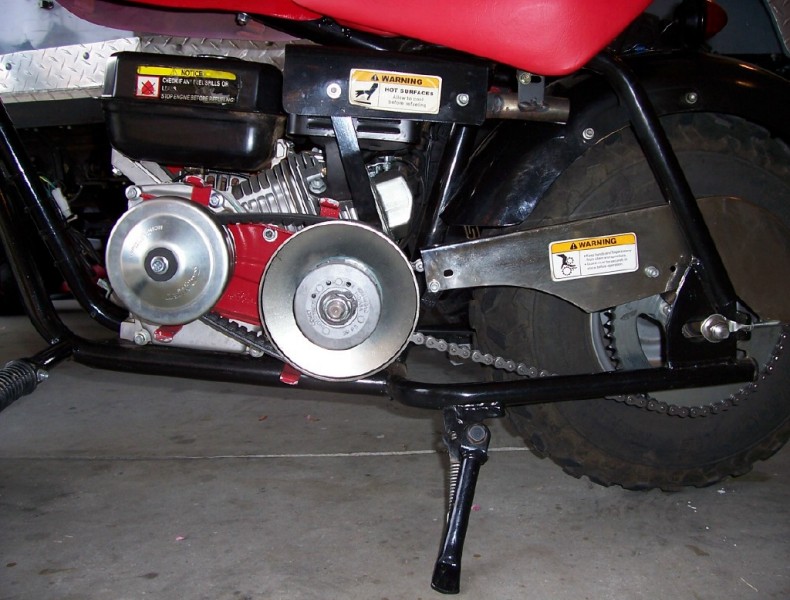
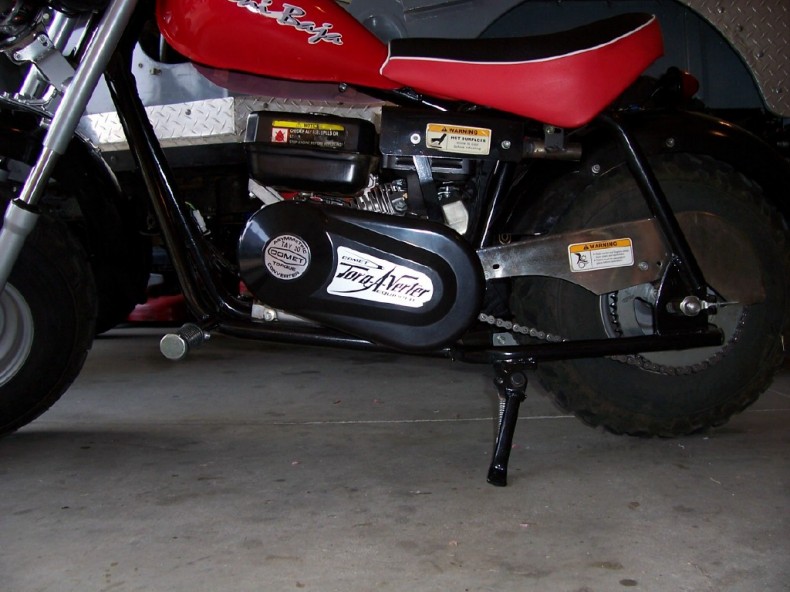
Get a TAV30 torque converter kit with the STEEL backing plate. The TAV2-30 has an aluminum backing plate, and it will not work (the fins on the back of the mounting plate hit the engine).
You will have to modify the new backing plate before you can mount it by doing the following:
1. The four tabs that mount the plastic cover to the backing plate are on with pop-rivets. The rivets will interfere with mounting the backing plate flush with the engine block. You will need to have the tabs welded to the mounting plate, then grind the rivets (back of the plate) flat. Not all four of them need to be done, just the ones that would touch the engine mounting surface. You'll see what I mean when you get the kit.
2. There are four sets of holed drilled on the backing plate for attaching to the engine block. One set will mount the unit (pivoted up) too high (hits the engine). The other set will work, but mounts (pivots) the unit too low (below the frame) and the belt isn't in line with the chain and rear sprocket. It will work though. What I did (and it worked well) was to drill a small pilot hole between the four sets of holes, then get the eight holes (four sets of two holes) welded up and ground flat on the mounting plate. Basically I spit the difference of the two mounting options. Then I drilled out the pilot holes to the proper size to mount on the engine.
These two modifications (cost me $30.00 to have done at a welding shop) allowed me to mount the unit flush to the engine block and have the torque converter belt pretty much in line with the chain and rear sprocket, and be above the bottom of the frame at its lowest point. After this it all pretty much just bolted right up. I painted the backing plate red before mounting it.
You will see a metal tab on the bike frame when you remove the old jackshaft/centrifical clutch unit that held up the jackshaft unit. That will have to be bent down flat with the engine mounting plate. You may also have to remove the thin aluminum heat shield on the underside of the engine for the new jackshaft unit to fit without hitting the engine. Both are simple to do. This will also clear the rear oil fill ok. It's a tight fit doing it with these modifications, but I think it is worth it.
I also added a link (maybe two) to the chain. It let me move the rear tire back a bit, and have it more centered under the rear fender. It looks better to me anyway.
Let me know if there's anything else I can do to help.
By Paul Dickenson
Below are the pictures.